終於拿到了,準備邁向 1500 分!
http://pogostick.net/~pnh/ntpasswd/
好用的工具
Supports all Windows from NT3.5 to Win7, also 64 bit and also the Server versions (like 2003 and 2008)
幾乎都支援啦
下載ISO後燒成光碟( 或是有USB版本 )
設定啟動, 之後會
今天在FB上看到的民調問答 , 問了下面這道題目
「 一顆糖果ㄧ塊錢 ㄧ顆糖有一張包裝紙 商店做促銷~三張包裝紙可以換ㄧ顆糖~ 你有15元~請問你一共可以吃幾顆糖?? 」
選項是 1. 20 2. 21 3. 22
你會選哪個....?
1. 新增軟體源
vim /etc/apt/sources.list
#deb cdrom:[Ubuntu 11.04 _Natty Narwhal_ - Release i386 (20110427.1)]/ natty main restricted
# See http://help.ubuntu.com/community/UpgradeNotes for how to upgrade to
# newer versions of the distribution.
deb http://ubuntu.stu.edu.tw/ubuntu/ natty main restricted
deb-src http://ubuntu.stu.edu.tw/ubuntu/ natty main restricted
## Major bug fix updates produced after the final release of the
## distribution.
deb http://ubuntu.stu.edu.tw/ubuntu/ natty-updates main restricted
deb-src http://ubuntu.stu.edu.tw/ubuntu/ natty-updates main restricted
## N.B. software from this repository is ENTIRELY UNSUPPORTED by the Ubuntu
## team. Also, please note that software in universe WILL NOT receive any
## review or updates from the Ubuntu security team.
deb http://ubuntu.stu.edu.tw/ubuntu/ natty universe
deb-src http://ubuntu.stu.edu.tw/ubuntu/ natty universe
deb http://ubuntu.stu.edu.tw/ubuntu/ natty-updates universe
deb-src http://ubuntu.stu.edu.tw/ubuntu/ natty-updates universe
## N.B. software from this repository is ENTIRELY UNSUPPORTED by the Ubuntu
## team, and may not be under a free licence. Please satisfy yourself as to
## your rights to use the software. Also, please note that software in
## multiverse WILL NOT receive any review or updates from the Ubuntu
## security team.
deb http://ubuntu.stu.edu.tw/ubuntu/ natty multiverse
deb-src http://ubuntu.stu.edu.tw/ubuntu/ natty multiverse
deb http://ubuntu.stu.edu.tw/ubuntu/ natty-updates multiverse
deb-src http://ubuntu.stu.edu.tw/ubuntu/ natty-updates multiverse
## Uncomment the following two lines to add software from the 'backports'
## repository.
## N.B. software from this repository may not have been tested as
## extensively as that contained in the main release, although it includes
## newer versions of some applications which may provide useful features.
## Also, please note that software in backports WILL NOT receive any review
## or updates from the Ubuntu security team.
# deb http://ubuntu.stu.edu.tw/ubuntu/ natty-backports main restricted universe multiverse
# deb-src http://ubuntu.stu.edu.tw/ubuntu/ natty-backports main restricted universe multiverse
deb http://ubuntu.stu.edu.tw/ubuntu/ natty-security main restricted
deb-src http://ubuntu.stu.edu.tw/ubuntu/ natty-security main restricted
deb http://ubuntu.stu.edu.tw/ubuntu/ natty-security universe
deb-src http://ubuntu.stu.edu.tw/ubuntu/ natty-security universe
deb http://ubuntu.stu.edu.tw/ubuntu/ natty-security multiverse
deb-src http://ubuntu.stu.edu.tw/ubuntu/ natty-security multiverse
## Uncomment the following two lines to add software from Canonical's
## 'partner' repository.
## This software is not part of Ubuntu, but is offered by Canonical and the
## respective vendors as a service to Ubuntu users.
# deb http://archive.canonical.com/ubuntu natty partner
# deb-src http://archive.canonical.com/ubuntu natty partner
## This software is not part of Ubuntu, but is offered by third-party
## developers who want to ship their latest software.
deb http://ubuntu.stu.edu.tw/ubuntu/ natty main
deb-src http://ubuntu.stu.edu.tw/ubuntu/ natty main
apt-get update
2. 安裝JDK , JRE
apt-get install sun-java-jre
jdk : wget jdk.1.6
安裝 : sh ./jdk1.6
cp-r jdk1.6 /opt/jdk1.6
3. 安裝tomcat 6
wget http://apache.cs.pu.edu.tw/tomcat/tomcat-6/v6.0.32/bin/apache-tomcat-6.0.32.tar.gz
tar -zxvf apache-tomcat-6.0.32.tar.gz
http://apache.cs.pu.edu.tw/tomcat/tomcat-6/v6.0.32/bin/apache-tomcat-
4. 環境變數設定
vim ~/.bashrc
JAVA_HOME=/opt/jdk1.6
export JRE_HOME=/usr/lib/jvm/java-6-sun-1.6.0.24/jre
export TOMCAT_HOME=/opt/apache-tomcat-6.0.32
export CLASSPATH=.:$JAVA_HOME/lib:$JRE_HOME/lib:$CLASSPATH
export M2_HOME=/opt/apache-maven-2.2.1
export PATH=$JAVA_HOME/bin:$JRE_HOME/bin:$TOMCAT_HOME/bin:$M2_HOME/bin:$PATH
5. 安裝 subversion
apt-get install subversion
svn
checkout svn://140.115.11.133/ncucc --username tyrc
cd /etc/yum.repos.d
wget 'http://www.jpackage.org/jpackage50.repo'
yum update
yum install yum-utils

yum install tomcat6 tomcat6-webapps tomcat6-admin-webapps
service tomcat6 start
yum install yum-utils
cd /opt
wget http://ftp.twaren.net/Unix/Web/apache//maven/source/apache-maven-2.2.1-src.tar.gz
tar -zxvf apache-maven-2.2.1-src.tar.gz
vim /etc/profile
JAVA_HOME=/usr/java/jdk1.6.0_25
JRE_HOME=$JAVA_HOME/jre
CLASSPATH=.:$JAVA_HOME/lib:$JRE_HOME/lib:$CLASSPATH
PATH=$JAVA_HOME/bin:$JRE_HOME/bin:$PATH
M2_HOME=/opt/apache-maven-2.2.1
export PATH USER LOGNAME MAIL HOSTNAME HISTSIZE INPUTRC JAVA_HOME CLASSPATH JRE_HOME M2_HOME
模擬環境: 新增一顆硬碟 , 將他加入現有之LVM , 並加大目前LVM之容量
[root@mt ~]# fdisk -l
Disk /dev/hda: 82.3 GB, 82348277760 bytes
255 heads, 63 sectors/track, 10011 cylinders
Units = cylinders of 16065 * 512 = 8225280 bytes
Device Boot Start End Blocks Id System
/dev/hda1 * 1 13 104391 83 Linux
/dev/hda2 14 10011 80308935 8e Linux LVM
Disk /dev/hdb: 122.9 GB, 122942324736 bytes
16 heads, 63 sectors/track, 238216 cylinders
Units = cylinders of 1008 * 512 = 516096 bytes
Device Boot Start End Blocks Id System
[root@mt ~]# fdisk /dev/hdb
The number of cylinders for this disk is set to 238216.
There is nothing wrong with that, but this is larger than 1024,
and could in certain setups cause problems with:
1) software that runs at boot time (e.g., old versions of LILO)
2) booting and partitioning software from other OSs
(e.g., DOS FDISK, OS/2 FDISK)
Command (m for help): n
Command action
e extended
p primary partition (1-4)
p
Partition number (1-4): 1
First cylinder (1-238216, default 1):
Using default value 1
Last cylinder or +size or +sizeM or +sizeK (1-238216, default 238216):
Using default value 238216
Command (m for help): t
Selected partition 1
Hex code (type L to list codes): 8e
Changed system type of partition 1 to 8e (Linux LVM)
Command (m for help): w
The partition table has been altered!
Calling ioctl() to re-read partition table.
Syncing disks.
[root@mt ~]# partprobe
[root@mt ~]# pvdisplay
/dev/hdd: open failed: No medium found
--- Physical volume ---
PV Name /dev/hda2
VG Name VolGroup00
PV Size 76.59 GB / not usable 26.69 MB
Allocatable yes (but full)
PE Size (KByte) 32768
Total PE 2450
Free PE 0
Allocated PE 2450
PV UUID dfXZbc-pfev-YMTz-XfiR-BveL-HUrl-fmd7Fu
[root@mt ~]# pvcreate /dev/hdb1
Physical volume "/dev/hdb1" successfully created
[root@mt ~]# pvdisplay
--- Physical volume ---
PV Name /dev/hda2
VG Name VolGroup00
PV Size 76.59 GB / not usable 26.69 MB
Allocatable yes (but full)
PE Size (KByte) 32768
Total PE 2450
Free PE 0
Allocated PE 2450
PV UUID dfXZbc-pfev-YMTz-XfiR-BveL-HUrl-fmd7Fu
"/dev/hdb1" is a new physical volume of "114.50 GB"
--- NEW Physical volume ---
PV Name /dev/hdb1
VG Name
PV Size 114.50 GB
Allocatable NO
PE Size (KByte) 0
Total PE 0
Free PE 0
Allocated PE 0
PV UUID f82VID-oKsl-ShjT-BZed-enmP-Tum4-ZbAIpM
加大VG及調整LV
以上步驟已用fdisk新增一LVM分割區 /dev/hdb1 並利用 pvcreate 轉成 PV
[root@mt ~]# vgdisplay
--- Volume group ---
VG Name VolGroup00
System ID
Format lvm2
Metadata Areas 1
Metadata Sequence No 3
VG Access read/write
VG Status resizable
MAX LV 0
Cur LV 2
Open LV 2
Max PV 0
Cur PV 1
Act PV 1
VG Size 76.56 GB
PE Size 32.00 MB
Total PE 2450
Alloc PE / Size 2450 / 76.56 GB
Free PE / Size 0 / 0
VG UUID yd3K0H-5IWd-N5AX-q5dZ-j9MP-2xHh-4qPRj2
[root@mt ~]# vgextend VolGroup00 /dev/hdb1
Volume group "VolGroup00" successfully extended
[root@mt ~]# vgdisplay
--- Volume group ---
VG Name VolGroup00
System ID
Format lvm2
Metadata Areas 2
Metadata Sequence No 4
VG Access read/write
VG Status resizable
MAX LV 0
Cur LV 2
Open LV 2
Max PV 0
Cur PV 2
Act PV 2
VG Size 191.03 GB
PE Size 32.00 MB
Total PE 6113
Alloc PE / Size 2450 / 76.56 GB
Free PE / Size 3663 / 114.47 GB
VG UUID yd3K0H-5IWd-N5AX-q5dZ-j9MP-2xHh-4qPRj2
[root@mt ~]# lvdisplay
--- Logical volume ---
LV Name /dev/VolGroup00/LogVol00
VG Name VolGroup00
LV UUID 41mdX5-GhDO-8xUU-cqY8-SrMr-HfME-EnkfsL
LV Write Access read/write
LV Status available
# open 1
LV Size 74.62 GB
Current LE 2388
Segments 1
Allocation inherit
Read ahead sectors auto
- currently set to 256
Block device 253:0
--- Logical volume ---
LV Name /dev/VolGroup00/LogVol01
VG Name VolGroup00
LV UUID 4k7mr6-1qkt-5p35-6oD7-IwPB-lN3V-ixf56I
LV Write Access read/write
LV Status available
# open 1
LV Size 1.94 GB
Current LE 62
Segments 1
Allocation inherit
Read ahead sectors auto
- currently set to 256
Block device 253:1
[root@mt ~]# df -h
Filesystem Size Used Avail Use% Mounted on
/dev/mapper/VolGroup00-LogVol00
73G 2.7G 66G 4% /
/dev/hda1 99M 19M 76M 20% /boot
tmpfs 489M 0 489M 0% /dev/shm
[root@mt ~]# cat /etc/fstab
/dev/VolGroup00/LogVol00 / ext3 defaults 1 1
LABEL=/boot /boot ext3 defaults 1 2
tmpfs /dev/shm tmpfs defaults 0 0
devpts /dev/pts devpts gid=5,mode=620 0 0
sysfs /sys sysfs defaults 0 0
proc /proc proc defaults 0 0
/dev/VolGroup00/LogVol01 swap swap defaults 0 0
[root@mt ~]# lvextend -L +100G /dev/VolGroup00/LogVol00
Extending logical volume LogVol00 to 174.62 GB
Logical volume LogVol00 successfully resized
[root@mt ~]# lvdisplay
--- Logical volume ---
LV Name /dev/VolGroup00/LogVol00
VG Name VolGroup00
LV UUID 41mdX5-GhDO-8xUU-cqY8-SrMr-HfME-EnkfsL
LV Write Access read/write
LV Status available
# open 1
LV Size 174.62 GB
Current LE 5588
Segments 2
Allocation inherit
Read ahead sectors auto
- currently set to 256
Block device 253:0
--- Logical volume ---
LV Name /dev/VolGroup00/LogVol01
VG Name VolGroup00
LV UUID 4k7mr6-1qkt-5p35-6oD7-IwPB-lN3V-ixf56I
LV Write Access read/write
LV Status available
# open 1
LV Size 1.94 GB
Current LE 62
Segments 1
Allocation inherit
Read ahead sectors auto
- currently set to 256
Block device 253:1
[root@mt ~]# df -h
Filesystem Size Used Avail Use% Mounted on
/dev/mapper/VolGroup00-LogVol00
73G 2.7G 66G 4% /
/dev/hda1 99M 19M 76M 20% /boot
tmpfs 489M 0 489M 0% /dev/shm
[root@mt ~]# resize2fs /dev/VolGroup00/LogVol00
resize2fs 1.39 (29-May-2006)
Filesystem at /dev/VolGroup00/LogVol00 is mounted on /; on-line resizing required
Performing an on-line resize of /dev/VolGroup00/LogVol00 to 45776896 (4k) blocks.
The filesystem on /dev/VolGroup00/LogVol00 is now 45776896 blocks long.
[root@mt ~]# df -h
Filesystem Size Used Avail Use% Mounted on
/dev/mapper/VolGroup00-LogVol00
170G 2.8G 158G 2% /
/dev/hda1 99M 19M 76M 20% /boot
tmpfs 489M 0 489M 0% /dev/shm
學校的NAT主機壞了,臨時抓了一台PC裝CentOS5.5 做NAT
安裝的時候就有跑出怪怪的訊息,但我沒理他
格式化的時候特別慢
結果裝好重開機後再核心的地方就出現錯誤訊息了 : no available legacy port
跑起來也頓頓的
查了一下google的結果是說有些PC裝centos會誤把SATA硬碟認成IDE硬碟,
於是去看了一下 /dev 的裝置, 果然把硬碟認成hdx
解決的方式是修改開機核心參數,在kernel 那一行的最後面加入 ide0=noprobe ide1=noporbe ....
重開後再檢查一次 /dev 下面的裝置 , 終於出現sdx了 :)
跑起來也順多了
沒問題後就把參數寫入 /etc/grub.conf
解決!
本教學只做實際設定範例,詳細原理可以參考鳥哥的Linux網站 http://linux.vbird.org/
環境設定:
先設定好兩張網路卡的IP和網段,所有區網內的IP從eth1這個介面(private ip)進來,由eth0介面(public ip)出去
第一張網卡 eth0 :
ip : 192.192.249.1
netmask : 255.255.255.0
brocast : 192.192.249.255
gateway : 192.192.249.254
第二張網卡 eth1:
ip : 192.168.100.1
netmask : 255.255.255.0
brocast : 192.168.1.255
1. 設定網路介面
# vim /etc/sysconfig/network-scripts/ifcfg-eth0
DEVICE=eth0
BOOTPROTO=static
TYPE=Ethernet
IPADDR=192.192.114.1
NETMASK=255.255.255.0
NETWORK=192.192.114.0
BROADCAST=192.192.114.255
ONBOOT=yes
GATEWAY=192.192.114.254
# vim /etc/sysconfig/network-scripts/ifcfg-eth1
DEVICE=eth1
BOOTPROTO=static
TYPE=Ethernet
IPADDR=192.168.100.1
NETMASK=255.255.255.0
NETWORK=192.168.100.0
BROADCAST=192.168.100.255
ONBOOT=yes
2. 開啟封包轉送
# echo "1" > /proc/sys/net/ipv4/ip_forward
3. 設定SNAT
# iptables -t nat -A POSTROUTING -s 192.168.100.0/24 -o eth0 -j SNAT --to 192.192.114.1
4. 檢查路由
[root@NAT ~]# route -n
Kernel IP routing table
Destination Gateway Genmask Flags Metric Ref Use Iface
61.221.253.160 0.0.0.0 255.255.255.224 U 0 0 0 eth1
192.168.100.0 0.0.0.0 255.255.252.0 U 0 0 0 eth0
0.0.0.0 61.221.253.161 0.0.0.0 UG 0 0 0 eth1
5. 將設定寫入scripts , 並設定開機自動執行
以上測試成功後就把它寫成scripts讓電腦開機時自動執行
# vim /etc/rc.d/rc.local
/root/firewall.sh
# touch /root/firewall.sh
# chmod +x /root/firewall.sh
# vim /root/firewall.sh
#!/bin/bash
# 開啟封包轉送
echo "1" > /proc/sys/net/ipv4/ip_forward
# 清除防火牆規則
for table in filter nat mangle
do
iptables -t $table -F
iptables -t $table -X
iptables -t $table -Z
done
# 設定NAT
iptables -t nat -A POSTROUTING -s 10.1.100.0/24 -o eth0 -j SNAT --to 192.192.114.1
環境設定:全新安裝的Fedora 14,並更新到最新版
# yum -y update
重開機讓部分更新設定生效( 這很重要喔!! 如果更新系統一定要記得做這個動作! )
# sync;sync;sync;reboot
安裝 wine
# yum -y install wine
下載utorrent,我一開始用 wine + µTorrent Stable (2.2) 竟然裝不起來, 所以我就下載了beta版的 µTorrent beta (2.2.1 build 24266)
# cd ~
# wget http://download.utorrent.com/beta/utorrent-2.2.1-beta-beta-24266.upx.exe
設定開機跑 runlevel 3
# vim /etc/inittab
id:3:initdefault:
檢查 vnc-server 執行狀態
# netstat -tnlp | grep vnc
tcp 0 0 0.0.0.0:6000 0.0.0.0:* LISTEN 1351/Xvnc
tcp 0 0 0.0.0.0:6001 0.0.0.0:* LISTEN 1379/Xvnc
使用VNC連線到桌面環境

應用程式-->Wine-->Wine Software Uninstaller

安裝 -> 點選剛剛下載的utorrent -> 開啟

之後就一直下一步就安裝完成了
重頭戲來了!接下在教大家怎麼在Fedora 14 中使用µTorrent 的 WebUI

如上圖,點選 uTorrent的功能表中的選項(O) -> 選項 可出現設定畫面
請依照圖中設定方式先設定好網頁介面的選項
接下來開啟瀏覽器: http://IP:8080/gui
他會跟你說
" The µTorrent WebUI does not seem to be installed. Click here to try to install it, or see the guide for more details. "
但是點選 here 安裝時又會告訴你....
" There was a problem installing µTorrent WebUI, please see the µTorrent log for more details."
發生錯誤!
這是因為我們是在wine的環境中執行uTorrent,所以只要手動去下載WebUI放到相對應的資料夾就可以了
# cd ~/.wine/drive_c/users/user1/Application\ Data/uTorrent/
# wget
rtorrent 介紹:
rtorrent 是一個可以在文字介面下使用的BT軟體
效能跟傳輸效率都是一流的
現在介紹給大家使用!
官方網站:http://libtorrent.rakshasa.no/
安裝環境 : Fedora core 14
安裝 rtorrent libtorrent
# yum -y install rtorrent libtorrent
autodl-setup
開心動物園的邀請功能真是太濫了啦
朋友一堆每次想要送動物給朋友都覺得好麻煩
為什麼他不設計成跟義氣仔女一樣的發送功能咧
不是都一樣是6waves的東西= =
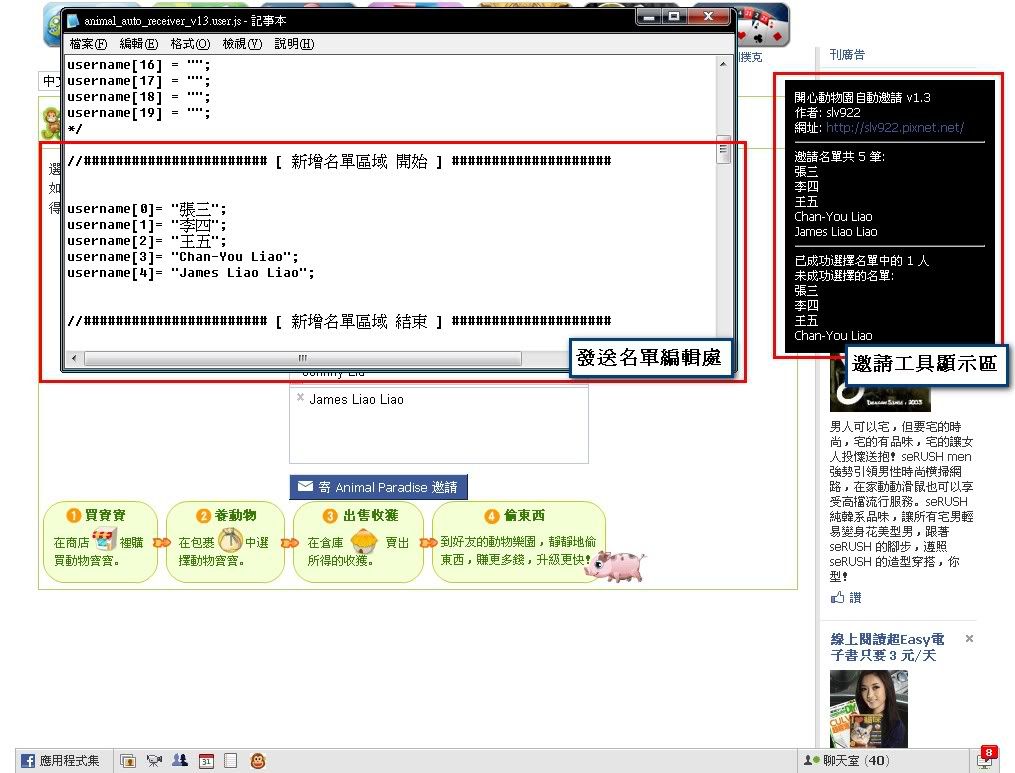
只好寫一個簡單的Script來自動點選邀請名單
第一次簡單的編輯一下名單,就能快速送出邀請名單
之後都不用在選擇要發送的名單囉,他會自動幫你點選^_^
分享給大家使用...
(( 點圖可放大 ))
Update Log
v1.3 下載
修正xpath語法
新增顯示未選擇到的名單
v1.2
改用xpath語法 (好用XD)
新增顯示選擇的人數
v1.1
修正1.0的錯誤語法
小提示: 更新腳本前請先清除舊的腳本,否則腳本會重疊喔!
Step 1
Step 2
最新 開心動物園自動邀請 v1.3 下載
Step 3
開啟Firefox
對著右下角小猴頭 按右鍵→管理腳本
1. 選取 animal_auto_receiver v1.2
2. 編輯
可以選取你習慣使用的編輯器,如果沒有的話可以用筆記本
路徑在C:\windows\NOTEPAD.EXE
Step 4
除了 [ 新增名單區域 開始 ] [ 新增名單區域 結束 ] 這個區段以外都不要動喔
除非你會改程式碼
修改說明:將要加入邀請名單的人依照以下格式填入 [ 新增名單區域 ]
例:username[0]= "張三";
username[1]= "李四";
每個人的邀請名額不一樣,因此數字部分假設你能邀請16人
就只能填到15,因為0~15共16個
//####################### [ 新增名單區域 開始 ] ####################
username[0]= "張三";
username[1]= "李四";
username[2]= "王五";
//####################### [ 新增名單區域 結束 ] ####################
Step 5
存檔離開後,開啟firefox到發送禮物的頁面
http://apps.facebook.com/animal_paradise/
選好禮物後進到選擇接收禮物的人的畫面
成功的話瀏覽器右邊就會跑出下面這張圖
很不會寫教學...寫的很濫= =
如果不懂請發問...
買地盤的好時機就是先開戰打到自己重傷
這時候別人是不能打你的!!!
重傷期間趕快去領錢 買地盤
不然小六又會被搶劫了...哈哈哈
4級 3同伴 - 4間賭場 4間酒店
http://apps.facebook.com/street-fights/details.php?id=1685401349
5級 噴八萬多
http://apps.facebook.com/street-fights/details.php?id=1146501451
6級 噴29萬 - 同伴超強 要單挑才能贏
http://apps.facebook.com/street-fights/details.php?id=512399983
6級 8賭場 8酒店
http://apps.facebook.com/street-fights/details.php?id=1280606438
7級 28賭場 28酒店
http://apps.facebook.com/street-fights/details.php?id=800863441
7級 1賭場 2酒店
http://apps.facebook.com/street-fights/details.php?id=100000099534232
8級 噴三萬多
http://apps.facebook.com/street-fights/details.php?id=782049447
9級 他的臉超欠扁 看了就想打 7賭場 10酒店 10夜總會 10桑拿
http://apps.facebook.com/street-fights/details.php?id=1208668737
11級 噴兩千萬大戶
http://apps.facebook.com/street-fights/details.php?id=1230204757
11級 5間DISCO
http://apps.facebook.com/street-fights/details.php?id=1638338576
11級 3賭場
http://apps.facebook.com/street-fights/details.php?id=1629470032
12級 15同伴
http://apps.facebook.com/street-fights/details.php?id=1733272448
13級 3酒店
http://apps.facebook.com/street-fights/details.php?id=1086805229
14級 16賭場
http://apps.facebook.com/street-fights/details.php?id=1744821163
相對於過去時常爆發大規模的蠕蟲癱瘓網路事件 (Slammer 、 Ninda 、 Netsky…) ,這兩三年來網路世界似乎平靜很多,主要的原因在於駭客已經改變了攻擊的目的,不再想出名炫耀、也不只是要證實自己的技術有多好,而是要實質的獲取利益,就如同 知名銀行搶匪 Willie Sutton 被問及為何要搶銀行時說了一句話:「因為那裏有錢。」。駭客運用的手法繁多,其中,網路釣魚 (Phishing) 已成為身份盜竊「產業」中成長最快速的技術之一。 2004 年 1 月,反網釣工作小組 (Anti-Phishing Working Group) 辨識出 174 個網釣網站,同年 12 月居然暴增超過 1,000 個。 2006 年,網路詐欺造成的消費者財務損失估計在 5 億 ( 根據美國聯邦交易委員會的統計 ) 到 20 億 ( 根據反網釣工作小組統計 ) 美元之間。國際知名資安組織 SANS 甚至發佈告警訊息: 2007 年將成為網路釣魚災害嚴重氾濫的一年。 |